This guide will guide you through the integration of XTENDISE into your network.
-
Locate the setup.ps1 file in the extracted folder. Right click the file and select Run with PowerShell
-
When the setup application opens select the option [3] Configure Application and proceed in the configuration tool.
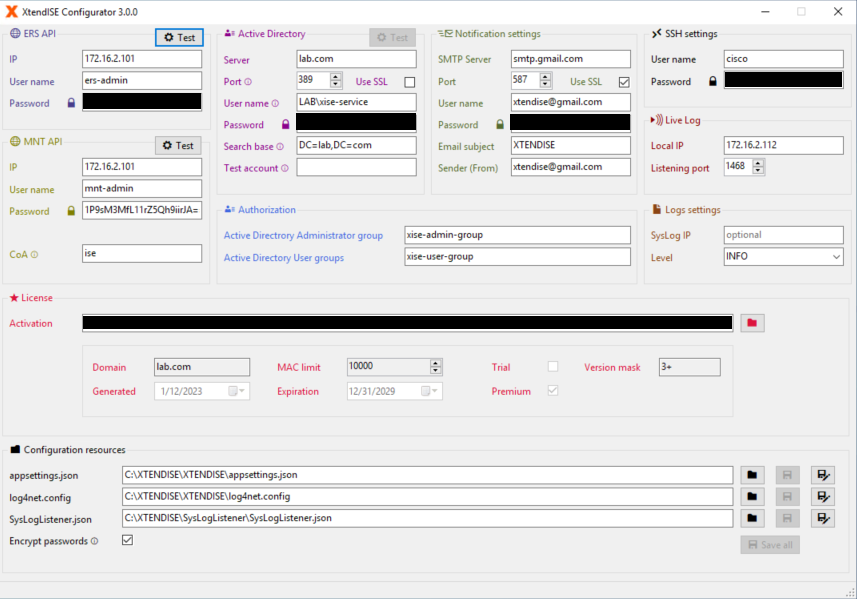
ERS API - Enter the Primary Policy Administration Node (PAN) IP and ers-xtendise user credentials.
Monitoring API - Enter the Primary Monitoring Node (MnT) IP and mnt-xtendise user credentials. In the CoA field enter the Policy Service Node (PSN) hostname (eq. ise-psn1) which will send CoA messages upon MAC address changes. If you do not know, enter the Policy Service Node which you consider as primary. XTENDISE queries PSN server for CoA whenever a MAC address is edited.
Active Directory Connection - Enter the information required for connection to a domain controller. Please make sure that the Search Base and User Name fields are entered in the correct format (Search Base field refers to the AD tree where XTENDISE will try to find XTENDISE User and Administrator accounts. This is usually a domain name entered as a distinguished name. For example domain example.com has distinguished name DC=example,DC=com). The entered user has to be able to read another AD accounts attributes and groups.
Notification Settings - Enter the SMTP server configuration. Leave the User Name and Password fields empty if no authentication is required (This is the preferred option, configure your SMTP server as an open relay for the XTENDISE IP address).
SSH Settings - XTENDISE will use entered credentials to connect to network devices.
Live Log - These fields should be prefilled automatically during the installation - do not change this configuration. If the fields are empty, enter the XTENDISE IP address (local server) and port 1468.
Log Settings - Enter your syslog/SIEM server IP address. Leave empty if external logging is not required.
License Key - Click on the folder icon and open the license file provided. License key will be automatically prefiilled from the file.
Encrypt Passwords - The passwords entered in this configuration are stored in the configuration file in plain text. If this option is checked, the passwords will be encrypted after the application is restarted and nobody will be able to read them.
- Save the configuration and click the Test buttons in the ERS API, MNT API and Active Directory sections. Active Directory test requires to enter a test account username (an Active Directory account of an XTENDISE Administrator) which you will authenticate in to the application.
Make sure that all tests passed and the test account is authorized in the Administrator role. If any test fails visit Installation issues page for help.
- If all tests passed, close the configuration tool and return to the PowerShell setup application. Restart the application by pressing number [5] Application Restart.
You should be able to open the XTENDISE web page now. Open address https://localhost from the XTENDISE server or https://<XTENDISE_IP_address> from your computer.
Please continute in Initial XTENDISE Configuration