In order to make XTENDISE work in your network, we need you to do some configurations in your environment.
1. Install Windows Server
- Get ready a virtual/physical server with Windows 2016/2019/2022 standard edition and with minimum of 4x CPU, 12 GB RAM, 200 GB HDD. The server has to be joined to your Active Directory domain.
- Download the latest XTENDISE version on the server. The latest XTENDISE version can be found here.
XTENDISE license does not include a Windows license. The customer is responsible for licensing of the Windows server
2. Configure Active Directory
- Create an service/user account in your Active Directory - This account will be used by the XTENDISE application to look up adminstrator accounts during authentication and authorization. You can reuse any existing service account with read only privileges.
- Create a group in Active Directory for XTENDISE administrators - Users in this group will be authorized in the application as Administrators
- Create a group in Active Directory for XTENDISE users (optional) - Users in this group will be authorized in the application as Users. User role is an optional role with limited privileges
Please see more information about User Authorization in the Authentication and Authorization section
3. Configure ISE
-
Enable ERS API
ISE 2.X - Navigate to Administration -> System -> Settings -> ERS Settings-> ERS Setting for Primary Administration Node and enable ERS for Read/Write
ISE 3.X - Navigate to Administration -> System -> Settings -> API Settings -> API Service Setting and enable ERS (Read/Write) -
Create API users - Navigate to Administration -> System -> Admin Access -> Administrators -> Admin Users and create two users:
User ers-xtendise in the admin group ERS Admin
User mnt-xtendise in the admin group MnT Admin -
Configure logging destination - Navigate to Administration / System / Logging / Remote Logging Targets and create a new logging destination with the following configuration:
Name - XTENDISE
Target Type - TCP syslog
Host/IP address - XTENDISE IP address
Port - TCP/1468
Maximum Length - 8192
Include Alarms For this Target - True
Buffer Messages When Server down - True
Leave other parameters in default -
Assign logging categories - Navigate to Administration -> System -> Logging -> Logging Categories and include the following categories: Failed Attempts, Passed Authentications, RADIUS Accounting, Administrative and Operational Audit
4. Configure Firewall rules
Configure the following fire rules.
| Source | Destination | Port | Note |
|---|---|---|---|
| XTENDISE | DNS Server | UDP/53 | Communication to DNS server |
| ANY | XTENDISE | TCP/80,443 | Access to the application |
| XTENDISE | AD server | TCP/389,636 | Communication to AD |
| XTENDISE | ISE (Both PAN nodes) | TCP/9060 | ERS API |
| XTENDISE | ISE (Both MnT nodes) | TCP/443 | Monitoring API |
| ISE (All PSN nodes) | XTENDISE | TCP/1468 | Logging for Live Log |
| XTENDISE | Switches | TCP/22 | Communication to switches |
| XTENDISE | ANY | ICMP | Device Keepalive Feature |
| XTENDISE | SMTP server | TCP/25 | Email Notifications |
| XTENDISE | SYSLOG server | UDP/514 | External logging |
Please note that the table lists communication requirements. If there is no firewall or any filtering device in your internal network, this step can be omited.
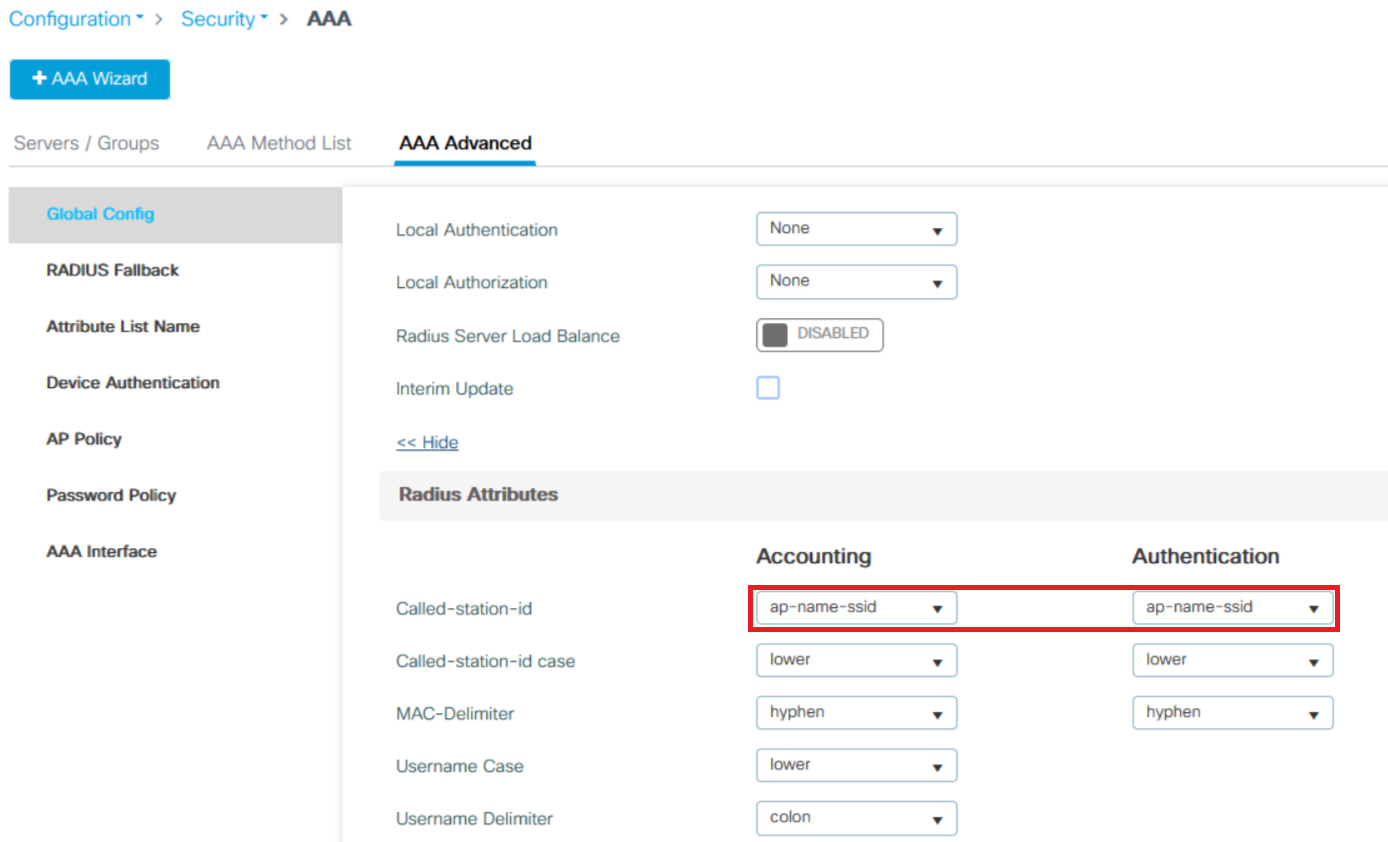
5. Configure WLC
Update the WLC configuration to log the AP name in the Called-Station-ID field in RADIUS accounting messages based on the picture bellow.
When you are done with configurations in your network, please continue in Install XTENDISE